When River was 4 and attending the local Waldorf school, she was invited to a birthday party where — instead of gifts — we were all asked to bring a half dozen small somethings to share with the other kids. It was like a loot bag potluck and I absolutely loved the idea.
Waldorf-y people are so clever like that, aren’t they…
Given the crowd, I knew that I had to come up with something good. Handmade, of course. Ideally from all natural materials that I harvested from Mother Earth myself by the light of a full moon. In retrospect, I might have put a bit too much pressure on myself.
It took me weeks, but I finally came up with the perfect idea: a peg doll roll, just like the one I bought from Purple Lizard Design on Etsy the year before.

Isn’t it adorable? The store that I bought it from doesn’t seem to be up and running anymore, but there are equally fabulous peg doll rolls on Etsy. Possibly more fabulous. I must have one.
For the kids, I mean.
So I was super excited about my amazing idea — except that there was no way I’d get the peg dolls in time for the party. No worries: I’d skip the peg dolls and do a crayon roll instead. Still cute — not as cute — but kind of cute, and very inexpensive. All I’d need was a box of crayons and scraps from my fabric stash.
Over the next few nights, I sewed up six rolls and they turned out beautifully. I was so proud. Seriously, I know I took pictures. It is killing me that I can’t find them.
I arrived at the party excited to see what everyone else had made. To my surprise, I was the only one that felt compelled to give up several nights of sleep in order to craft the perfect loot bag trinket. Some of the families brought candy. Some of the families brought plastic. From a store.
Looking back, I admire those families and their overall life balance.
One family nailed it, though. I remember that they gave out little star-shaped crayons that they had made by melting down old crayon bits. What a brilliant idea! I vowed to do the same thing with our old crayons as soon as we got home.
Three years later…
But of course I never got around to it. Just like the felt food sets I never finished, and the knitting projects I still have to bind off, and the cross-stitch project that I just barely started before tossing it aside. I’m the queen of not finis–
(See what I did there?)
Three years after that party, we started using the Wayfarers homeschooling curriculum for River. The same author offers a free preschool program called Pathways, so I printed it off to use with Harbour. Why not, right? Pathways is essentially a schedule of high-quality stories to read, plus some activity ideas thrown in to keep life interesting. And the very first activity? Gather up your old broken crayons and melt them down using silicone molds. Not just any molds, but financier (financi-what?) molds, which give the upcycled crayons a lovely rectangular shape that will “also prevent little ones from developing incorrect pencil grips which will then have to be corrected,” according to the instructions.
I’m sure I could have used any molds, of course. But I wanted the financier molds.
Pencil grip is important. I think?
Two years after that…
It took me a full two years to find the perfect molds. In a store, I mean. Sure, I could have ordered them from Amazon, but … yeah, I don’t know why I didn’t just order them from Amazon. They’re not even that expensive.
Whatever. Perfectly-sized rectangular molds suddenly appeared at Michael’s, and with my 40% coupon … well … I still paid way more than if I had just used a muffin mold from the dollar store. I didn’t care though — I was too excited to channel my inner-teenaged-pyro and start melting things. Finally.
MAKE NEW CRAYONS FROM OLD CRAYONS
Step 1: Gather Your Crayons
As soon as we got home, I hauled out the crayon bin.

As you can see, it’s a mess. I see beads, wrappers, rubber bands, rocks … and is that a potato? I pulled out all the crayons and tossed everything else.
Step 2: Sort Your Crayons by Colour
Next, I separated all the crayon bits into
Because look.
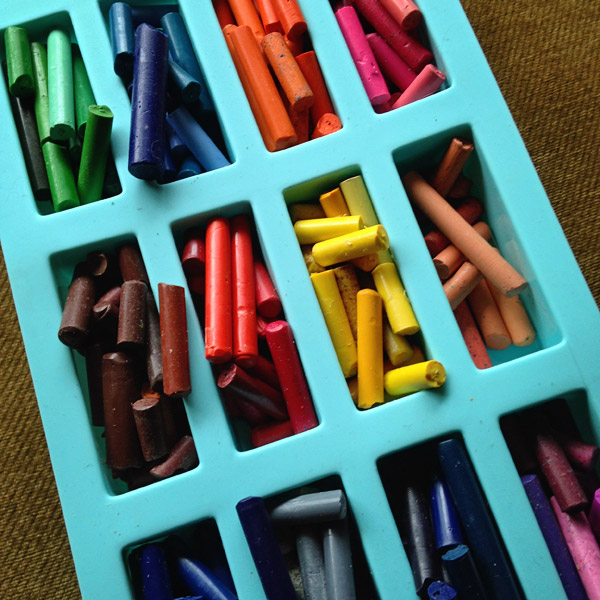
Happy sigh.
Step 3: Break Your Crayons into Little Pieces
I read about 15 tutorials that all said to cut your crayons into small pieces. Pfffttt… that seemed like a lot of work for something we were just going to melt anyway, right? I decided that snapping the crayons into halves or thirds would be good enough. I aimed for roughly 1-inch pieces.
At first, breaking a crayon in half is kind of fun. It has a bit of that forbidden fruit kind of quality to it. Harbour used to compulsively break every crayon in half whenever we bought a new pack, and I could finally understand why.
Snap, snap, snap. Snap snap.
And then ouch.
Once you’ve snapped 20, then 30, then 40 or 50 crayons in half, your fingers start to ACHE. My 1-inch pieces turned into 2-inch pieces. I didn’t care — I didn’t think it would matter that much.
Ha ha ha ha. I was wrong.
Step 4: Bake Your Crayons at a Low Temperature
I put my silicone mold on a
Crayons are actually flammable, so you don’t want to keep them in the oven for a super-long time. You need the pieces to be small so that they melt down as quickly as possible. And not only are crayons flammable,
Seriously, in all the tutorials that I read, I can’t believe the smell didn’t come up once. I opened the windows and I blasted the exhaust fan and I started to worry about what would happen to our pet
Go Back and Do Step 3 Properly (Optional)
In the interest of moving things along more quickly, I pulled the mold back out of the oven and carefully cut the crayons into pieces, just like all the tutorials told me to. It helped. In no time, I had crayon soup.

Once the crayons were melted, we used a toothpick and swirled the

They were so, so pretty.
In fact, my two-year-old spends just as much time playing with the crayons as he does

To be honest, I don’t enjoy actually

This is one of my son’s masterpieces: it’s actually the first lesson from Harbour’s All About Reading’s Pre-Reading kit, but she has ZERO interest in anything that hints of busy work; now it’s pretty much an expensive
(If I ever sign up for the AAR affiliate program, please forget I said that. I swear, it’s not the program, it’s my kid.)
Anyway, there are tons of tutorials for making crayons available on Pinterest. These are the directions for the crayons that I followed, as found in the free Pathways curriculum.
“Break crayons into small pieces. We use a dinner knife when necessary. Place the silicone financier pan on a metal pan for easy removal from the oven. Fill each block; you can add different colors to each block, or you can keep each crayon a solid color.
Heat at 150 degrees for 15-20 minutes or at 250 degrees for 10-15 minutes. Watch carefully; the wax will scorch if heated too long.”
And smell. The wax will also smell if heated too long. I wonder if that’s why Waldorf-y people always use beeswax crayons?
They’re so clever like that, aren’t they…
Leave a Reply