November has been a bit of a rough month. Novembers are usually difficult, what with the days getting shorter and the weather getting colder and the end of the homeschool year nowhere in sight.
We made it through two birthdays — River is now 9, which is HALFWAY to adulthood! (*cue panicky tears*). And me? I’m halfway to … I don’t know, what do people do when they’re 74? I’ll probably end up hanging out in a smoky bingo hall with my fellow septuagenarians, still talking about that time when Trump was president. What a crazy four-month-ride that was, we’ll say. Thank goodness for that alien-invasion/zombie-apocalypse/worst-episode-of-Punk’d-ever, we’ll say.
But those days of 14-hour bingo sessions are still a long way off, and right now I’m scrambling to keep the house clean and get the school lessons done and at the very least start making some Christmas gifts, because apparently that’s barely a month away. (*cue more panicky tears*)
My Monthly Planner
Part of the reason that I’ve been disorganized is that I didn’t make up the monthly planner that I rely on to keep me sane. I’ve actually had the planner pages printed off and sitting on my kitchen table for three weeks now, but I haven’t gone ahead and spent the five minutes binding them into a functional booklet because — and this is so ridiculous — I really, really love my monthly planner booklets and I wanted to show you all in a blog post how fun they are to make. But I haven’t found that perfect combination of three fully occupied children and good photo lighting yet.
So, no November planner.
Why do I love my planner so much? I think it’s because my planner is exactly what I need to guide me through the day. I make a new monthly planner each month with the day’s schedule on the left and the homeschool subjects that I’d like to teach on the right.

I’m sure that it sounds like a pain, printing off a new planner each month. At first, I thought that I would hate all that work, but I don’t — not at all. I love that I can tweek our schedule from month to month. What’s more, I’ve discovered that stitching pages into a booklet and trimming the edges is immensely satisfying. Now I make all sorts of booklets just for fun.
I keep my booklets in a Midori-style traveller’s notebook — or fauxdori — that I made myself. A traveller’s notebook is a leather cover that uses elastic bands to hold booklets in place. The booklets can be removed easily and swapped with other booklets or accessories, making the traveller’s notebook extremely versatile.
I lurv it.
Making a Homemade Traveller’s Notebook
Last week — on that day when I turned half of 74 — I ended up at Chapters browsing the journal section. I wanted something a bit more elegant than my DIY, but nothing was quite what I wanted.
Naturally, that meant I had to make my own.
I headed downtown to the leather supply store the very next day. I told the sales person that I needed leather for a journal and she asked what kind. I said “brown” because I am utterly clueless about all things leather. She led me to a wall of rolls in different colours and weights and told me to pick the one that spoke to me.
I knew exactly what I wanted — a not-too-thin brown piece, dark but not too dark, maybe more of a cinnamon shade than a cocoa shade, and nothing overly saturated.
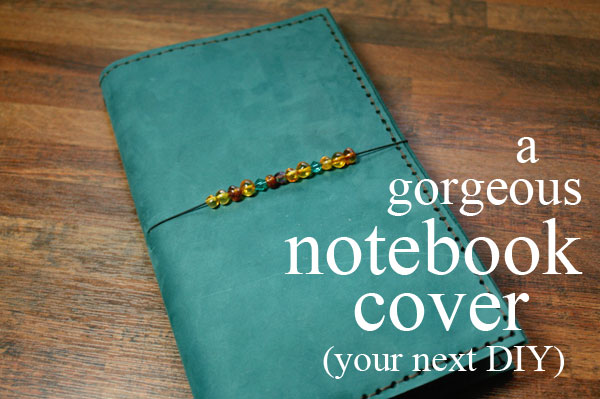
Then I saw a teal roll and suddenly there was no other leather on the wall — all I wanted was the teal.
I didn’t even hesitate – I immediately knew that this was the leather for me. Well, wait – I had to check the price first. Just $5/square foot? Okay, now I knew that this was the leather for me.
I ended up buying $30 worth, partly because I was afraid I’d make a mistake while cutting but mostly because I panicked and made random gestures in the air until the saleswoman just made an educated guess at how much I needed. It turned out to be the perfect amount — I have enough for an iPad cover and possibly a second journal.
As soon as we got home, I got to work. I cleared off my table and pulled out my cutting mat and a rotary cutter.

Okay, let’s just stop for a minute. What is going on with my table here?! This is the reason that we use a tablecloth every day, by the way. It’s not a decor choice or even an attempt to protect the table — we’re way past that stage. No, tablecloths are the only thing that stop me from seeing the damage that my kids have inflicted on my lovely dining set, which makes me want to sit down and cry.
“Memories are more important than tables.”
“Wood can be refinished.”
“My kids will someday watch their own beloved furniture get destroyed by my grandchildren.”
These are the mantras that get me through the day.
Mantras, plus pretty leather journal covers. So let’s get started already.
(1) Cutting the Leather
First step: cut the the leather. I used an Exacto knife when I made my first traveller’s notebook. Never again. The rotary cutter was so much easier. It cut clean, straight lines with no trimming needed. I was done in just minutes. I cut out a large rectangle piece that’s almost exactly 8.5 x 11 inches, and then two smaller pieces that are 8.5 x 3(ish) inches.

(2) Punching Holes for the Stitches
Next: add stitching. This is completely optional, of course; there are a lot of Midori-inspired covers that don’t have stitching at all and they’re gorgeous. Seriously, I want them all.
But this journal was calling out for stitching. In youtube tutorials, the instructors create a groove in the leather with a tool that I can only imagine is called something awesome like The Groovinator. Once they’ve added a groove for the stitches to sit in, the youtube instructors use another amazing tool that rolls along in the groove and marks out spaces where the holes need to be punched. I haven’t named that tool yet, because I haven’t thought of a name cool enough.
However, I’m too cheap for things like “necessary equipment”, so I etched a line in my leather with the flat-head screwdriver that I stash in my china cabinet, and then I marked off the hole spacing with a Sharpie.
UPDATE: “One tip – you can do the ‘groove thingy’ with a fork where you’ve bent one tine on the end over by just a bit, then use the bent tine to make the groove, and the second tine as a guide, and run it along the edge of the leather.” Amazing! Thanks, Jason from Hamilton Folk School!

Once my holes were marked, I grabbed the medieval torture device that I found in my basement. It’s a standard leather punch that I must have purchased … for some reason? Honestly, I don’t even know where it came from. It’s a handy tool though — it’s just like a paper hole punch, but the wheel at the top rotates, letting you pick the size of hole to cut. And it’s a whole lot sharper than a regular hole punch, of course. And more freaky looking.
(3) Stitching the Leather
Once I punched the holes in each of the three pieces of leather, I cut some cord for stitching. I used a simple saddle stitch, which is quick and easy and looks really sharp. Saddle stitch is fun because you sew with both ends of the cord at the same time: one needle passes through a hole from front to back, and then the other needle passes through that same hole from back to front, and on and on and on. Check out this video to see saddle stitch in action.
(4) Adding Elastics
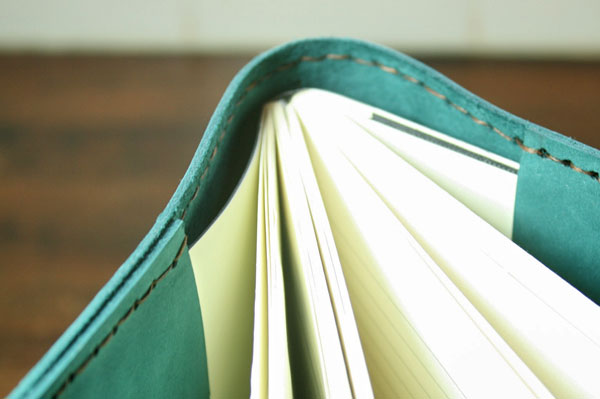
The final step for making a traveller’s notebook is to thread elastic through the middle of the cover, Midori-style. This is the key to a traveller’s notebook: the elastic holds your booklets in place until you want to swap them out.

I marked off the holes with a Sharpie — two at the top, and two at the bottom. My leather punch doesn’t reach far from the edge, so for this step, I grabbed my husband’s trusty … well, actually we don’t know what it is. It’s just a metal tool that he uses when he builds tiny model airplanes. We got it from an old roommate who took it home from work 15+ years ago and forgot to bring it back. I believe that the proper tool for this job is an awl, but if you have a stabby-metal-thing-from-Mike (which is what we call it), that works equally well.
I poked the holes in the leather and threaded the elastic through, first from top to bottom, and then from second-top to second-bottom. The longer stretch of elastic holds a booklet in place while the shorter piece is tied into a knot and basically ignored.

It’s okay that the leather curves in a bit when you first tie your knot — the cover will sit flat once the booklets are added.
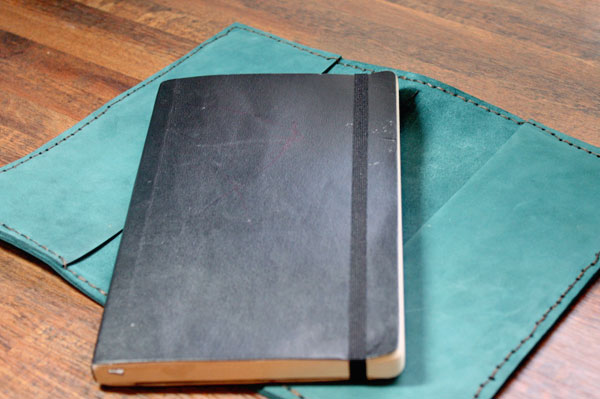
To insert a booklet, simply find the middle page and then slide the booklet in between the two elastics, allowing the top elastic to lie flat in the crease. Easy, right?

Don’t you love the cowl in this photo? It’s called Starshower. A fitting name, given that I’ve hit the infamous knitter’s black hole. I started the cowl half a year ago and I swear it hasn’t gotten one inch longer, no matter how long I work on it. I printed off this pattern with maybe five others and I bound them into a booklet that I always keep with me. I even added a few sheets of graph paper at the end for jotting notes on. It’s been so handy because no matter where I go, I have my patterns and my notes with me.

This is a shot of the cover holding three different booklets. The patterns booklet is secured in the middle with the elastic. There’s a blank notebook that the kids colour in tucked in the front pocket, and my October planner is tucked into the back pocket. I could have also added more elastics to hold the booklets too. Lots of choices.
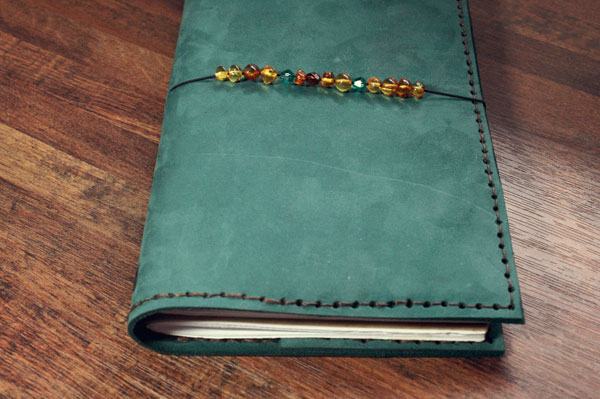
The very last step for making a traveller’s notebook is to add the elastic that keeps the whole notebook closed when it’s not in use. I poked two holes in the spine of my cover and threaded an elastic through.
Then, because I’m feeling fancy, I added some beads that were left over from my amber wrap bracelets. It’s entirely possible that they’ll drive me nuts when I try to lay my notebook flat. It’s also entirely possible that I’ll leave them there anyway because I’m too lazy to untie the knot.

The Perfect Handmade Christmas Gift
Now, I’m thinking that homemade traveller’s notebooks would be killer Christmas gifts. If you skip the stitching and the inner pockets, these leather covers will take less than half an hour to make. You don’t even need to make the booklets yourself — you can grab a set of three Moleskin cahiers and they’d work beautifully. You could even buy a thicker notebook or agenda and tuck the outer covers into the inner pockets instead of using the elastic system.
The beauty of a traveller’s notebook is that it’s flexible enough to appeal to both friends and family. Well, your friends and family, I mean. For some reason I’m surrounded by vegetarians who don’t love leather the same way I do. Sigh. It’s hard to be an omnivore in a world of herbivores — seriously, I have to eat three times more delicious bacon just to make up for all the bacon that they refuse to eat! I do it, though, for them. Because I’m a kind and loving person like that.
And the same with this traveller’s notebook: I’m happy to make two covers and keep them both for myself.
It is the season to be generous, after all…
Leave a Reply